Printable Elapsed Time Anchor Chart for Same-Day Problems
Print an elapsed time anchor chart for same-day problems, with matching number-line and T-chart examples, a blank template and answer checks.
On this page
Printable elapsed time anchor charts for same-day problems include a completed chart with start and end times, jump lengths and an inverse check. The anchor chart also includes a blank version that can be printed.
Elapsed time word problems are one of the most challenging math problems to teach and master, even more so when you add in elapsed time anchor charts! In addition, some teachers may prefer to use visual aids or manipulatives for teaching this concept, which is why we have created printable anchor charts and corresponding worksheets that will help students understand how to find the missing information within these types of word problems.
To solve any given elapsed time problem, you must first determine what’s unknown. Then, based on the relationship between the knowns and the unknowns, identify the operation that you need to perform. Once you know what you’re doing, solving these problems is easier than you might think!
Identifying the Unknown
Within each word problem, there will be something missing (what is the elapsed time? How long was the trip? When did the train arrive?). Once you determine what the unknown is, you’ll know which operation to use. For example:
If you’re looking for duration, you’ll count forward from the beginning time to the ending time.
If you’re trying to figure out the missing ending time, then you’ll add the duration to the starting time.
If you’re trying to figure out the starting time, subtract the duration from the ending time.
Once again, it’s important to look for clues in the text itself. If a problem tells you that someone went to the store at 8:30 a.m. and returned at 10:45 a.m., you can simply count the number of hours between 8:30 a.m. and 10:45 a.m. by moving your fingers across the clock face. That’s easy enough, right?
But if the question changes slightly — for instance, “how long was the trip?” — you need to take another approach to figure out how long it took the person to return home.
What makes elapsed time problems so difficult is the lack of concrete numbers and the way the hour hand moves across the clock face. Students must understand that the clock face represents different values depending on its position (the top of the clock face shows the number 12), but they also need to learn how to convert these into minutes or seconds.
This is why we created printable elapsed time anchor charts and accompanying worksheets that provide both visual cues and opportunities for practice. You’ll find our complete elapsed time anchor chart below, along with instructions for printing a worksheet for your students to fill out as well.
A Completed Elapsed Time Anchor Chart
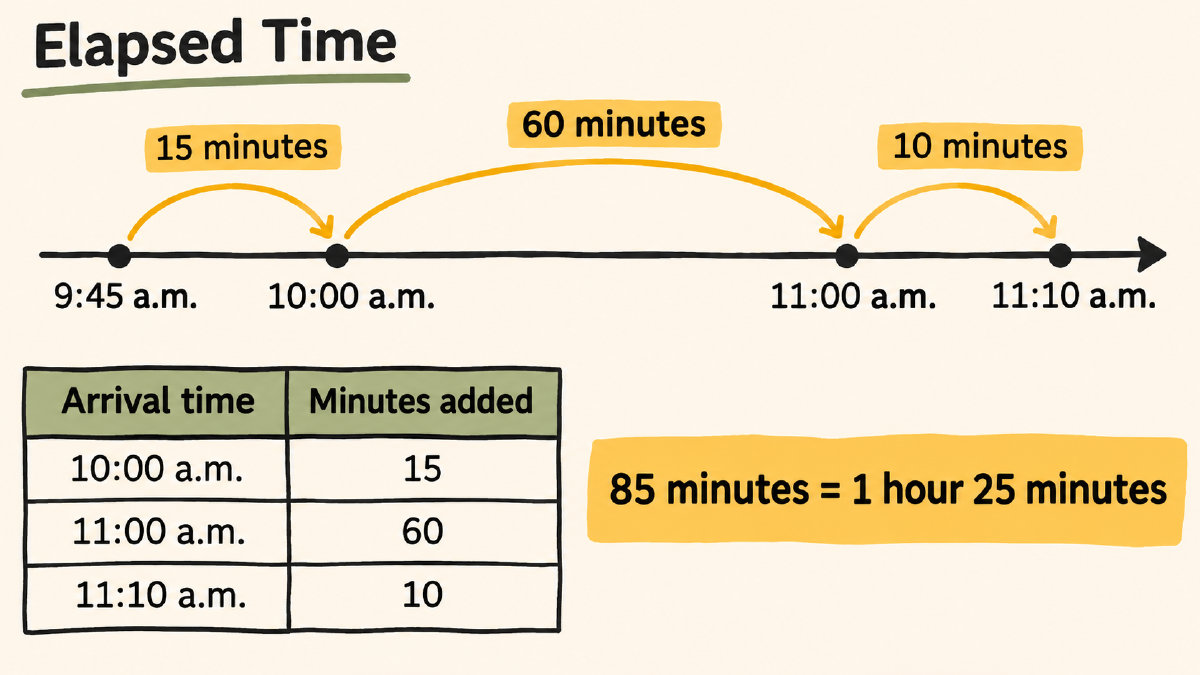
Here’s a sample elapsed time anchor chart with all the answers filled in. It pairs a labeled diagram of a number line showing how to move from the beginning to the end of an event (a trip, an errand, etc.) and a two-column T-chart listing the arrival times and the lengths of each jump.
Start: 9:45 a.m. | End: 11:10 a.m.
9:45 a.m. → (+15 minutes) 10:00 a.m. → (+60 minutes) 11:00 a.m. → (+10 minutes) 11:10 a.m.
| Arrival time | Jump length |
|---|---|
| 10:00 a.m. | 15 minutes |
| 11:00 a.m. | 60 minutes |
| 11:10 a.m. | 10 minutes |
From the above anchor chart, the number line shows three jumps, representing the three segments of the trip from 9:45 a.m. to 11:10 a.m. The durations were determined as follows:
From 9:45 a.m. to 10:00 a.m. is 15 minutes.
From 10:00 a.m. to 11:00 a.m. is 60 minutes.
From 11:00 a.m. to 11:10 a.m. is 10 minutes.
You’ll notice that the answer to the question (“How long did it take?”) is the total of the three jumps (15 + 60 + 10 = 85 minutes), or 1 hour and 25 minutes. However, the anchor chart also provides a second method of checking the work: using the formula “start time + duration = end time.”
So 9:45 a.m. plus 1 hour and 25 minutes equals 11:10 a.m. Which means that the original calculation was correct.
The anchor chart also provides space to write the final answer down. But don’t worry about having to write it down yourself — we’ve already provided the answer for you.
We’ve included a blank version of this anchor chart below. Print it out, cut it apart, and distribute it to your students.
Start: ______ | End: ______
Number line: ______ → ______ → ______ → ______
Label each arrow with its jump length.
| Arrival time | Jump length |
|---|---|
| ______ | ______ |
| ______ | ______ |
| ______ | ______ |
Total duration: ______
Check: start time ______ + duration ______ = end time ______
A Blank Version of the Elapsed Time Anchor Chart
There are a number of advantages to using a blank anchor chart instead of a completed one, especially when teaching elapsed time to young learners. For example, using a blank anchor chart allows your students to experiment with their own ideas without being restricted by the answer key. It’s also an opportunity to teach them the value of double-checking their work before they submit an answer.
In terms of content, the blank anchor chart has been designed to accommodate the same amount of information as the completed chart, only with spaces left empty where answers would typically go. This includes space to label the beginning and end of a journey or event, draw the arrows that represent the individual steps taken during a journey, and place the labels next to the arrows that show the time it took to complete the step.
Using both the completed and the blank versions of the anchor chart is a great way to reinforce learning, and to encourage your students to think critically about the process of problem-solving. We hope you found our printable elapsed time anchor charts helpful! If not, feel free to contact us anytime. We’d love to hear what we could improve upon, and what other topics we could cover here on our blog.
Clarifying Unit Conversions
Let’s clarify the difference between a.m. and p.m. on a clock face. Since 1 hour equals 60 minutes, 1 minute is equal to 1/60th of an hour. Similarly, since 1 hour is equal to 60 minutes, 1 minute is equal to 1/60th of an hour. So, if we had started at 10:00 a.m., gone through noon, and finished at 12:15 p.m., that’s exactly 135 minutes, or 2 hours and 15 minutes. If we started at 11:50 a.m., and moved to noon, then continued until 12:15 p.m., that’s 10 minutes, followed by another 15 minutes — a total of 25 minutes.
As mentioned earlier, the unit conversions aren’t particularly important unless you want to do mental math. What is really important, however, is that we know whether the time is in the morning or afternoon. Clock-hand positions alone won’t tell you that, because those clocks don’t indicate whether it’s morning or afternoon.
Checking a Completed Chart
One of the easiest ways to ensure that a completed chart is accurate is to add its duration back to the start time. That is, once you’ve added up the durations of the various jumps, just make sure that those added durations equal the time between the beginning and the end of the event.
For example, if you started your trip at 2:45 p.m. and ended at 4:10 p.m., the duration should be 1 hour and 25 minutes. Simply add the durations together to confirm that you’ve done the math correctly. You’ll see that we’ve already provided the duration of the trip above. So, you can simply add the durations together to verify that the total duration of the trip is 1 hour and 25 minutes.
You can also use the existing calculator workflow as an optional comparison. Enter the completed start and end times in 12-hour format, with a.m. and p.m. matching your problem and no break deducted. Then select “Calculate” and compare the returned duration with your answer.
Check the Start Time
If you have the start and end times, the process for finding the duration is straightforward. Just add the durations together. And the answer will be either a number in minutes or an expression in hours and minutes.
You can even check the answer using the existing calculator workflow. Enter the completed start and end times in 12-hour format, with a.m. and p.m. matching your problem and no break deducted. Then select “Calculate” and compare the returned duration with your answer.
It’s also possible to check the answer by simply adding the durations together, rather than using the existing calculator workflow. But either way, the result will be the same: 1 hour and 25 minutes.